Of Tools and Toys: Calibrations, Adjustments, and Data Plots for CNC Machines
As mechanics, technicians, metrologists and calibrationistas, we have the opportunity to work with many tools and different types of equipment. Between CMS North America and CMS SpA, we have spent over $1M on equipment to calibrate and evaluate our machines. But, without the knowledge to operate and evaluate the data these devices provide for us, all we really have is a bunch of expensive toys. We need to be able to turn these toys into tools. This month, I have a very good example of how these toys became a tool to evaluate and solve a problem. Read the full article and I’ll show you how not to toil with your tools, but tinker with your toys and topple the toughest troubles.
Evaluation of A Mishap
Let me set the scene of our evaluation: The customer owns an Ares machine and at some point, things went bump in the night. The following day they were having problems making good parts. No one fessed up to having a mishap with the machine, so they called me to come take a look. The machine was nearly new, and, as it is with any new mechanical device, if something is going to fail or have problems, it’s usually in the first month or so, or it will last years. Going in, I was expecting to look at bearings, gears, loose hardware, encoders, alignments, and anything that relates to positioning. The equipment I had with me was a Renishaw ballbar, a Renishaw laser interferometer, and a dial indicator.
The first thing I did was check the quickest, easiest, and most obvious items that might cause the problem. These include backlash, encoder feedback, following errors, head alignment, and servo drive performance. These all seemed pretty normal, so the next thing to do was to turn one of my toys into a tool. Generally, I choose to use the ballbar first to try to identify a problem, because it is quick and can be moved around the machine to cover a lot of area. The advantage is, if anything is wrong it will let you know. The drawback is, it has difficulty in pinpointing a problem, so it’s up to us to isolate the issue.
For those of you who don’t know what a ballbar is, it’s a very accurate linear encoder with tooling balls on each end. It kind of looks like a mini barbell, like at the gym. To use it, you place the tooling balls in cups, one mounted in the spindle, and the other fixed to the machine. A program is written to drive the machine in a circle. As the ballbar is driven in this circle, it records its length along the path. With this data, all kinds of crazy things can be evaluated. We can measure backlash, stick slip, master-slave change over, squareness, scale mismatch, straightness, servo mismatch, and several other things.
The way a ballbar is primarily used is to make a circle in the 3 planes of a machine. That would be X-Y, X-Z, and Y-Z. These circles can be of various sizes, from 50 mm up to 1200 mm and even larger. The circles can be run at various speeds, from a crawl up to full rapid, depending on what you’re trying to evaluate. I generally run a 150 mm and a 1200 mm circle, or a 150 and the largest the machine is capable of. I run them at 2000, 5000 and 10,000 mm/min. If the machine is cutting in excess of 10,000 mm/min then I’ll run the test at the maximum cutting speed. I will also move the origin of the test around the machine so 70-80% of the machine’s travel can be evaluated.
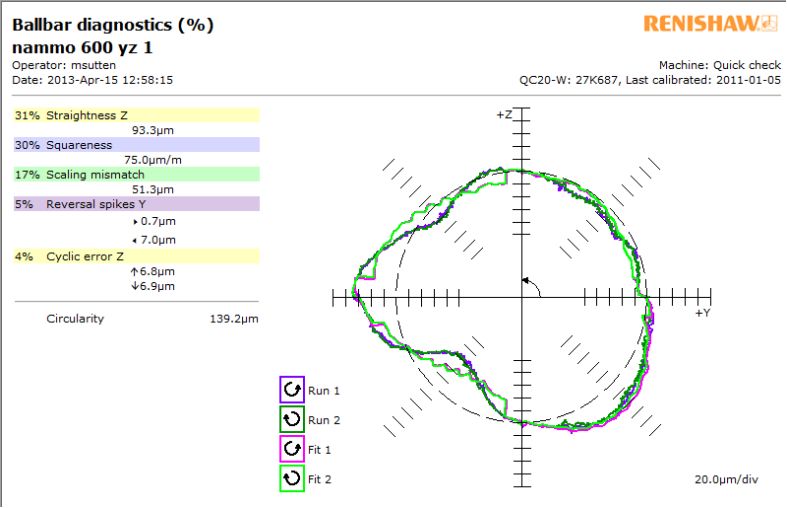
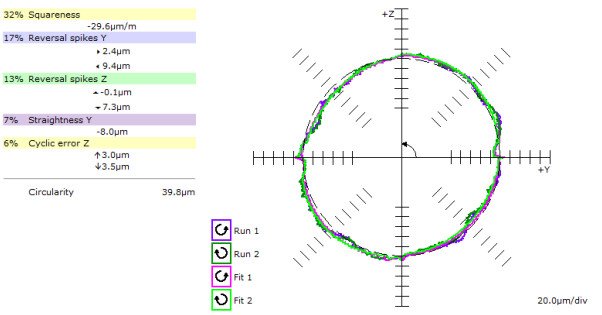
I won’t flood you with graphs, so below is the single graph where I found there to be an anomaly. Remember, in a perfect world, the graph would be a perfectly round, smooth circle.
As you can see, it’s not very round!! This is a 600 mm radius circle, and the divisions on the graph are 20 um or close to one one-thousandth of an inch. At the 9 o’clock position, it’s about 5 heavy, and at 7 o’clock it’s 3 shy. In empirical terms, that’s 0.008”. Not what we’re shootin’ for! After running this circle I knew I had the fish in the barrel, now I just had to get a hold of him. Remember, I had run several other tests very close to this one, and they all came out round. This circle was run in the Y-Z plane toward the front of the machine.
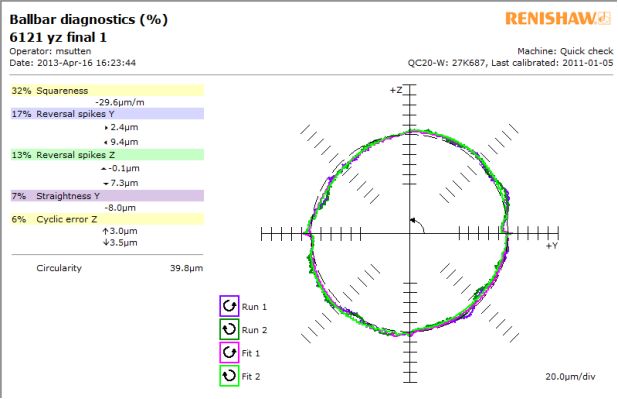
If you want to cheat, go to the last graph in this article and you’ll see how a good ballbar should look.
OK, as I mentioned, the ballbar will tell us something is wrong, but it’s up to us to isolate it and resolve the issue. The other toy I had with me was the Renishaw laser interferometer. This is basically a really fancy tape measure. It can measure down to one one-millionth of a millimeter. You need really good eyes to see that on a tape! From the ballbar graph, I saw the biggest bump at 9 o’clock. This correlates to being parallel to the Y axis. I set up the tape measure on the Y axis, and below is what I measured.
I originally calibrated this machine, and at that time the linear positioning was under 25 microns or 0.001 inch. It appears as if that fish we have in the barrel has teeth!
To explain the graph, the bottom numbers are the linear positions of the Y axis. In this case, 2600 mm to the LH vertical side is the error from the commanded position. From zero out to about 1300 mm, we’re looking pretty good, then all heck breaks loose. At this point, I knew exactly what was wrong with the machine and what had happened. Do you?
What could cause an axis to be linearly correct for half of the axis travel, then all of a sudden go long for 800 mm, then go short for about 700, then be nearly correct again at the end? To put this in perspective, if we ask the machine to drill a hole at 800 mm, we would get a hole at 800 mm plus a few microns. If we ask the machine to drill a hole at 1600 mm, we would get a hole at 1600 + 180 microns, or almost 0.008” off target!
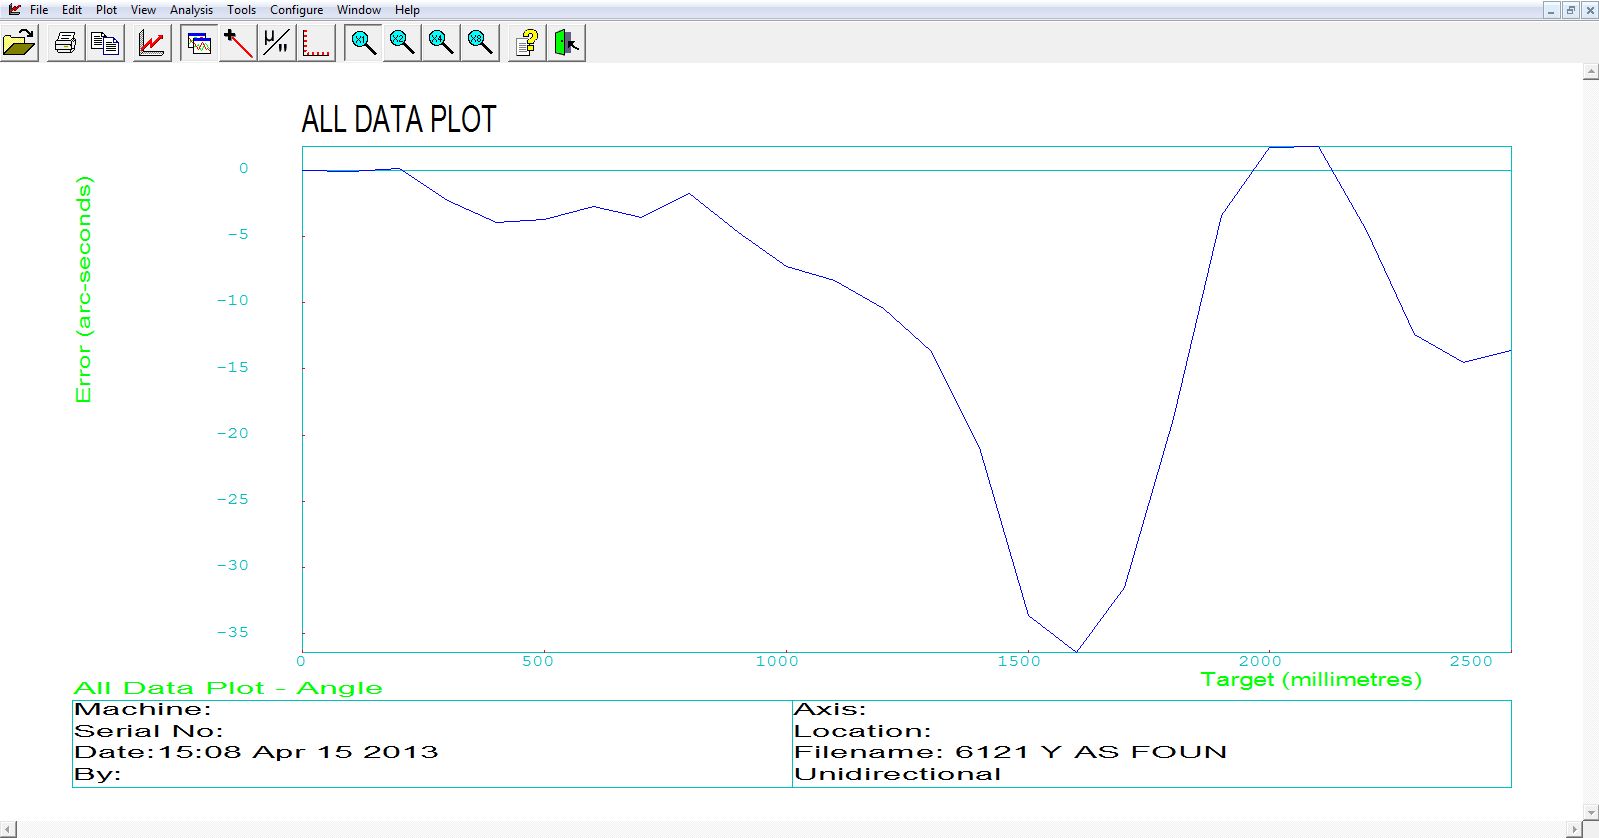
Another function of this fancy tape measure is the ability to measure angles. Without getting too in-depth, the laser uses a beam splitter and two reflectors—it sends out two beams and compares the length of the beams. By knowing exactly how far apart the reflectors are, the software can determine the “pitch,” or angle, of what’s being measured. That’s what we’ve done below. The units usually used are arc/seconds. (60 seconds in a minute, 60 minutes in a degree, so 3600 arc/seconds in one degree) A good, flat axis is no more than 5 arc/seconds off pitch.
As you can see, the angle begins to change exactly at the same point we start to lose linear distance in the previous graph. We can also see the angle reverses and ends up relatively near the middle. What could cause this?
Now we have the fish in the barrel and know it has teeth, but we also know he uses those teeth to eat grass and doesn’t like the taste of fingers. What happened to this machine is the Z axis was going down and ran into something that didn’t want to move. The machine had been told to go down, and, bound and determined to get where it was told to go, it pushed hard. Unfortunately, the machine lost this battle, and as it pushed down against this immovable object, the Y axis bearing rails were pushed up. If we were to put a straight edge along the bearing rail, we would see a hump in it starting at 1000 mm and ending at about 2000 mm.
There is one other thing I could have done to verify my hypothesis, and that would have been to use another set of optics and measure the vertical displacement of the bearing rails. I could have used our Hamar laser to measure this also. It just so happens that CMS machines have a very accurate bearing rail shoulder machined into the machine. The final test is to use a simple feeler gauge and see how big a gauge I could slip between the shoulder and the rail.
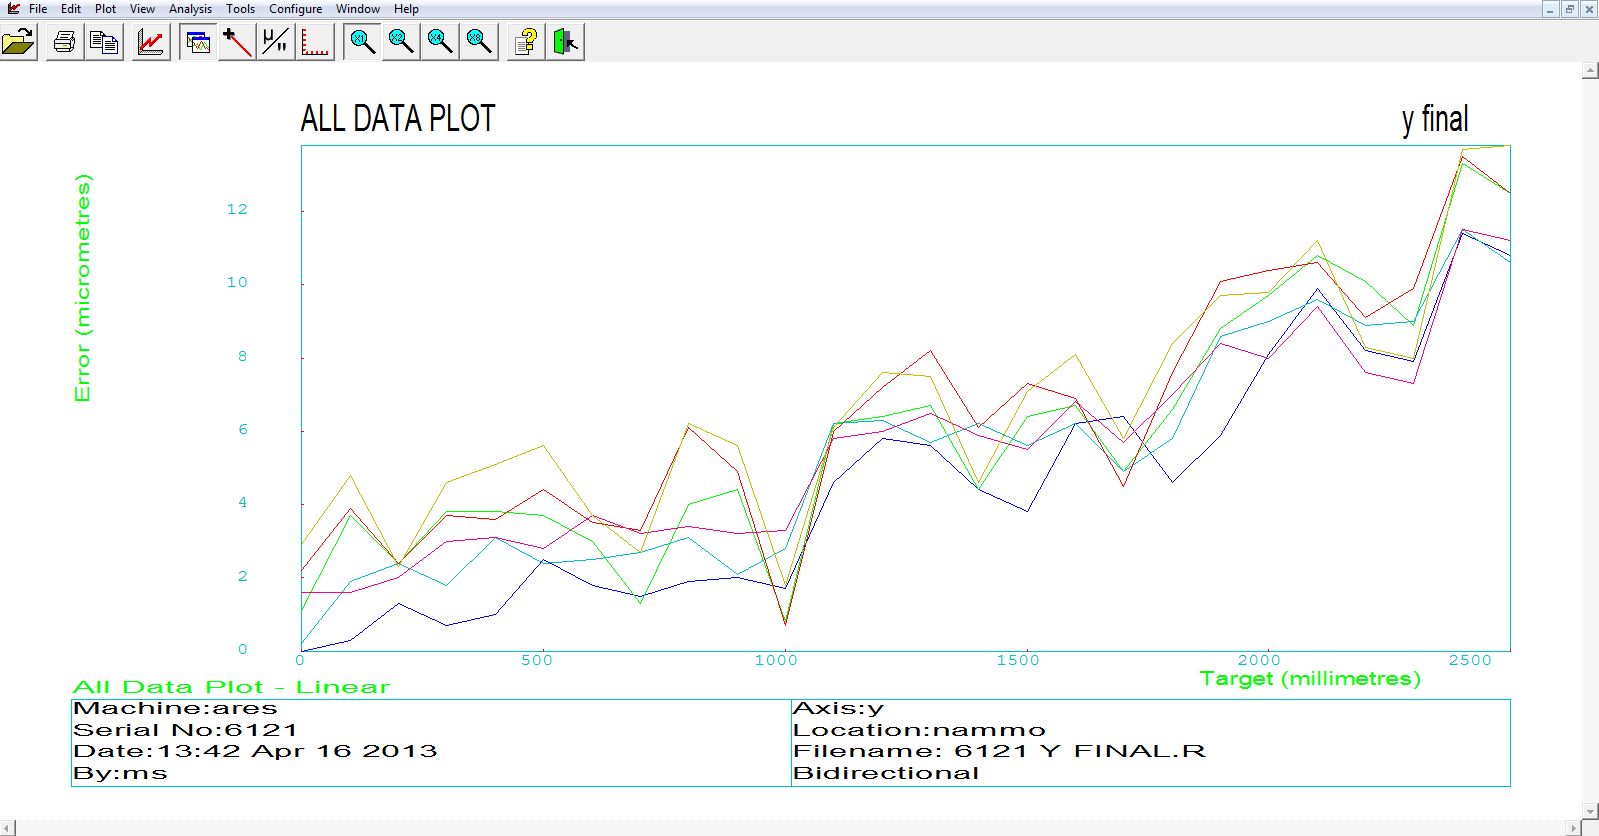
Fortunately, it’s easily fixed by loosening the bearing rail and reseating it on to the machined shoulder and redoing the previous tests. Below you will see the final linear tests and ballbar tests. The linear shows three bidirectional runs in accordance with B5.54 standards, with a total deviation of 15 microns (or ½ a thousandth of an inch), and a ballbar that is round and smooth.
So that’s how it’s done. We caught the fish, gave him a big kiss on that tooth filled mouth, and let him go back to eating grass. That how the technicians and metrologists of CMS turn toys into tools and give our customers the best machines in the industry.


